Remote pairing is the process of syncing your Arctic Start remote transmitters, often called key fobs, with the Arctic Start remote start or security system in your vehicle. These systems use secure wireless technology to send signals from your remote to your car, similar to how a TV remote works. As wireless devices become more common, securing these connections is crucial to prevent interference and ensure your Arctic Start system operates correctly. To establish this secure, private connection for your Arctic Start system, you need to pair your remote.
Understanding Remote Pairing for Your Arctic Start System
Arctic Start systems rely on what’s known as remote pairing to function properly. This pairing process creates a unique and secure communication channel between your key fob and your vehicle’s system. Think of it as introducing your specific remote to your car, so they can understand each other’s signals. This is essential for security and to prevent accidental activation or interference from other devices using similar wireless technology.
Step-by-Step Guide: Programming Your Arctic Start Remote Fob
Programming your Arctic Start remote is a straightforward process you can do yourself. Before you begin, make sure you have your vehicle’s ignition key and the Arctic Start remote(s) you want to program. It’s also a good idea to check that your remote(s) have sufficient battery power.
- Unlock and/or disarm your system: If your Arctic Start system’s security features are active, start by unlocking and disarming it.
- Turn the ignition on and off five times: Use your vehicle’s ignition key to quickly turn the vehicle’s power on and off five times within 5 seconds. Crucially, only turn the key from the OFF position to the ACC (Accessory) or ON position. Do not start the engine during this step.
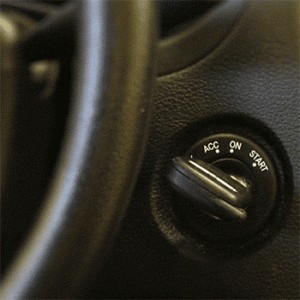 Animation showing how to turn the ignition key to ACC or ON five times to program an Arctic Start remote car starter fob
- Press the lock button: Press and hold the lock button (usually marked with “I” or a lock symbol) on your Arctic Start remote for one second. Avoid holding the button longer, as this might prevent the command from registering correctly.
- Pair additional remotes: If you have more remotes to program, repeat the previous step (step 3) for each additional remote.
- Remove the ignition key: Once you have programmed all your remotes, remove the key from the vehicle’s ignition.
It’s important to note that if you start the pairing sequence but don’t send any commands from a compatible remote, the system will automatically enter valet mode as a safety measure. If this happens, you’ll need to refer to the instructions on how to deactivate valet mode for your Arctic Start system.
When You Might Need to Reprogram Your Remote
You’ll typically need to use the remote pairing feature when you are adding a new remote to your Arctic Start system. Arctic Start systems are designed to be modular, which means they use interchangeable parts. This modularity gives you flexibility and makes it easier to replace components if needed. However, because of this design, whenever you add a new remote, even if it’s the same model as a previous one, it won’t be recognized by your system until you complete the remote pairing sequence. This ensures that only authorized remotes can control your vehicle’s remote start and security system.