Integrating your garage door opener with your car is a fantastic way to streamline your daily routine. No more fumbling for separate remotes – simply use a button in your vehicle to control your Ryobi garage door opener. This guide will walk you through the steps to program your Ryobi garage door opener to your car, ensuring a smooth and convenient experience.
Understanding Compatibility and Preparation
Before you begin, it’s important to understand that programming your car to your garage door opener often involves compatibility with systems like HomeLink or Car2U. Most modern vehicles come equipped with a built-in garage door opener system. Check your car’s manual to identify if you have such a system and how to program it. Typically, these systems learn the frequency of your garage door opener remote.
For this process, you’ll generally need:
- Your car’s owner manual (for instructions on your car’s system)
- Your Ryobi garage door opener remote
- Access to your Ryobi garage door opener motor unit
Step-by-Step Guide to Program Your Car to Your Ryobi Garage Door Opener
The most common method involves using the “Learn” or “Program” button on your Ryobi garage door opener motor unit in conjunction with your car’s built-in system. Here’s how to do it:
-
Clear Existing Car Programming (If Necessary): If you’re programming a new garage door opener or reprogramming an existing button, you might need to clear the existing codes in your car. Consult your car’s manual for instructions on how to clear the memory of your car’s garage door opener system. This usually involves pressing and holding one or two buttons in your car for a certain duration.
-
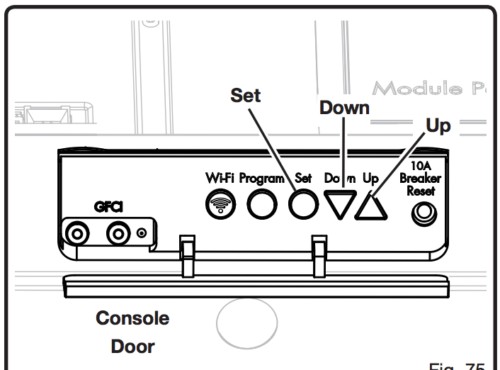
Locate the Program Button on Your Ryobi Opener: Access the back panel of your Ryobi garage door opener motor. You’ll find a “Program” or “Learn” button. The location might vary slightly depending on your model, but it’s usually clearly labeled and accompanied by an LED indicator.
-
Enter Programming Mode on the Ryobi Opener: Press and release the “Program” button on your Ryobi garage door opener motor. Immediately after pressing, an LED light near the button will usually turn on or blink, indicating that the opener is in programming mode. You typically have a short window of time (usually 30 seconds) to complete the next steps.
-
Initiate Programming from Your Car: Refer to your car’s owner manual for the specific steps to program your car’s garage door opener system. Generally, this involves pressing and holding the button in your car that you want to program to operate your garage door. While holding the car’s button, you might need to cycle your car’s ignition or press another button in your car – again, your car’s manual is the best resource here.
-
Synchronize with the Ryobi Opener: While your car is in programming mode (as per your car’s manual), and the Ryobi opener is also in programming mode (LED blinking or lit), you may need to press and release the button you are programming in your car again. In some cases, the car system learns automatically once the Ryobi opener is in program mode and you are holding the button in your car. Watch for the indicator light on your Ryobi opener. It should blink or turn off, indicating it has received the signal from your car.
-
Test the Programming: After these steps, wait a few moments, and then press the programmed button in your car. Your Ryobi garage door should activate. If it doesn’t, repeat the steps, ensuring you are following both your car’s and Ryobi opener’s instructions precisely.
Setting Travel Limits (If Needed)
While programming your car primarily links the car’s button to the opener’s frequency, you might need to ensure your Ryobi opener’s travel limits are correctly set. This ensures the door opens and closes fully and safely. Here’s a quick overview, referencing the original article for detailed steps:
Setting the Open Travel Limit
- Enter Open Travel Limit Programming: Press and hold the Up Arrow button on the back of the opener for about 3 seconds until it blinks.
- Adjust the Door Position: Use the Up and Down Arrow buttons to move the door to your desired fully open position.
- Save the Setting: Press the “Set” button. The Up Arrow light will stop blinking and stay lit.
Setting the Close Travel Limit
- Enter Close Travel Limit Programming: Press and hold the Down Arrow button for about 3 seconds until it blinks.
- Adjust the Door Position: Use the Up and Down Arrow buttons to move the door to your desired fully closed position.
- Save the Setting: Press the “Set” button. The Down Arrow light will stop blinking and stay lit.
Programming Other Accessories (Keypads and Remotes)
While your main goal might be car integration, you might also want to program other accessories. The original article provides instructions for these, which are still relevant:
Programming Outdoor Keypad
- Keypad Programming Mode: Press and hold the 1 or 3 button and the On/Program buttons on the keypad simultaneously until the LED flashes three times.
- Enter PIN: Enter your four-digit PIN on the keypad.
- Opener Programming Mode: Press the Program Button on the back of the garage door opener.
- Synchronize Keypad and Opener: On the keypad, press On/Program and then enter your PIN.
- Finalize: Press the 0 button on the keypad within 30 seconds to confirm.
Programming Remotes
- Opener Programming Mode: Press the Program button on the back of the opener.
- Remote Synchronization: Press the 1 or 2 button on the remote.
- Test: Press the programmed button on the remote to test operation.
Troubleshooting Tips
- Range Issues: If your car button works intermittently, ensure your car is within a reasonable range of the garage door opener. Obstructions can sometimes affect signal strength.
- Frequency Conflicts: In rare cases, interference from other devices might occur. Try reprogramming both your car and the opener.
- Car System Compatibility: Double-check your car’s manual for specific compatibility notes with garage door openers. Some older systems might require compatibility bridges or external receivers.
- Battery Issues: Ensure the batteries in your Ryobi remote are fresh, as a weak battery can sometimes cause programming or operational problems.
Conclusion
Programming your Ryobi garage door opener to your car enhances convenience and security. By following these steps and consulting your car’s manual, you should be able to seamlessly integrate your garage door opener with your vehicle. Remember to test the programming thoroughly after completion. If you encounter any difficulties, re-read the instructions carefully, and consider consulting the Ryobi garage door opener manual or seeking professional assistance from a garage door specialist.