Have you ever wished you could open your garage door without fumbling for a remote? Programming your Linear garage door opener to your car’s built-in system or a car remote can significantly streamline your daily routine. No more searching for the remote or worrying about dead batteries – just press a button in your car, and your garage door smoothly opens. This guide will walk you through each step, making the process straightforward and stress-free, so you can enjoy the ultimate convenience.
Understanding the Basics: Antenna and Learn Button
Before diving into the programming process, it’s crucial to understand two key components of your Linear garage door opener: the antenna and the learn button. These are essential for establishing communication between your car and the garage door system.
Locating the Antenna
The antenna is responsible for sending and receiving radio signals. It allows your car or remote to communicate with the garage door opener motor. Here’s what to look for:
- Visual Inspection: Typically, the antenna is a thin wire, often around 6-12 inches long, hanging down from the garage door opener motor unit. It might be straight or coiled.
- User Manual: Your Linear garage door opener manual is your best friend. It will have diagrams specifically showing the antenna’s location.
- Motor Unit Housing: Sometimes, the antenna is less obvious, possibly integrated within the motor unit’s housing. In these cases, the manual is essential for identification.
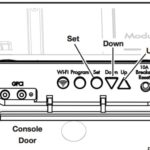
Identifying the antenna and learn button on your Linear garage door opener unit.
Importance of Antenna Condition:
Ensure the antenna is in good condition. A damaged, bent, or broken antenna can significantly reduce the signal range and make programming and operation unreliable. If you notice any damage, consider consulting a professional for repair or replacement.
Finding the Learn Button
The “learn” button is the magic key to programming your car or remote. This button puts the garage door opener into a learning mode, allowing it to recognize and store the signal from your car’s transmitter. Here’s how to find it:
- Color and Label: The learn button is usually a small, colored button (often yellow, red, orange, or purple) on the garage door opener motor unit. It’s typically labeled “Learn,” “Program,” or “PRGM.”
- Location on Motor Unit: Look directly on the motor unit, often on the back or side panel. It’s usually near where the wiring connects to the motor.
- Light Indicator: Some models have an LED light next to the learn button that illuminates when pressed or when the unit is in learn mode.
- Wall Control Panel: In some rare cases, the learn button might also be located on the wall control panel inside your garage, but it’s most commonly on the motor unit itself.
A close-up view of a typical “Learn” button on a garage door opener motor.
Note: The exact location and color can vary slightly depending on the specific Linear model. Always refer to your owner’s manual for the most accurate location.
Pairing Your Car to the Linear Garage Door Opener
Now that you’ve identified the antenna and learn button, you’re ready to program your car. The process generally involves activating the learn mode on your garage door opener and then transmitting a signal from your car’s garage door control system. Here are the step-by-step instructions:
Step 1: Prepare Your Car’s Transmitter
Most modern cars come equipped with a built-in garage door opener system, often Homelink or Car2U. Refer to your car’s manual to understand how your in-car system operates. You might need to clear existing programs or understand which buttons to use for programming.
- Clear Existing Programs (If Necessary): Some car systems recommend clearing out old programs before adding new ones. Consult your car’s manual for instructions on how to do this, if needed.
- Identify Programming Buttons: Locate the buttons in your car that are designated for garage door control. These are usually located on the rearview mirror, visor, or dashboard.
Step 2: Activate Learn Mode on the Garage Door Opener
This step must be done at the garage door opener motor unit in your garage.
- Locate the Learn Button: Find the learn button on your Linear garage door opener motor unit as described earlier.
- Press and Release: Press and release the learn button. Do not hold it down. When activated, a small LED indicator light near the button might turn on or blink, indicating it’s in learn mode. Note: Learn mode is typically active for only 30 seconds to a few minutes, so be ready to proceed quickly to the next step.
Step 3: Transmit Signal from Your Car
Immediately after activating the learn mode on the garage door opener:
- Get in Your Car: Enter your car and turn the ignition to the “ON” position (you don’t need to start the engine).
- Press and Hold Car Button: Press and hold the button in your car that you want to use to control your garage door. Hold it for 2-3 seconds.
- Observe Indicator Lights: Watch for the indicator light on your garage door opener motor unit. It should flash or blink, or the garage door opener lights might flash. This indicates that the opener has received the signal from your car.
- Repeat if Necessary: Some systems require you to repeat pressing and holding the car button multiple times (2-3 times), with a few seconds in between each press. Refer to both your car’s manual and the Linear garage door opener manual for specific instructions.
Step 4: Test the Programming
After the indicator lights confirm successful programming:
- Press the Programmed Car Button: Press the button in your car that you just programmed.
- Check Garage Door Response: Your garage door should now open or close when you press the button in your car.
- Troubleshooting: If the garage door doesn’t respond, repeat steps 2 and 3, ensuring you are within range and pressing the correct buttons. If it still doesn’t work, consult the troubleshooting section later in this guide.
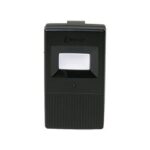
The process of pairing a remote, similar to pairing your car, involves pressing the learn button and then transmitting a signal.
Programming Additional Remotes or Keypads
You might also want to program additional devices like keychain remotes or wireless keypads. The process is very similar to programming your car:
Step 1: Prepare the Additional Remote/Keypad
- Fresh Batteries: Ensure the remote or keypad has fresh batteries.
- Reset (If Needed): If it’s a used remote, you might need to reset it to factory settings first. Check the device’s manual.
Step 2 & 3: Activate Learn Mode and Transmit Signal
These steps are identical to programming your car, but instead of pressing a button in your car, you press the desired button on your remote or enter the code on your keypad immediately after pressing the “Learn” button on the garage door opener.
Step 4: Test the Programming
Test the newly programmed remote or keypad to ensure it operates the garage door correctly.
Troubleshooting Common Issues
Sometimes, programming doesn’t go as smoothly as planned. Here are some common issues and how to troubleshoot them:
1. Car or Remote Not Responding:
- Check Batteries: Ensure both your car (if using a car’s built-in system) and any handheld remotes have good batteries.
- Range: Make sure you are within a reasonable range of the garage door opener when programming and operating (usually within 20-30 feet).
- Obstructions: Obstructions between your car/remote and the garage door opener antenna can weaken the signal.
- Reprogram: Try repeating the programming steps carefully. Sometimes, the timing or button presses need to be precise.
2. Interference:
- Other Devices: Electronic devices emitting radio frequencies (like Wi-Fi routers, cordless phones) can sometimes interfere with garage door opener signals. Try moving these devices further away from the garage door opener if you suspect interference.
3. Learn Button Issues:
- Learn Mode Timeout: Remember that the learn mode usually times out quickly. Make sure you press the car/remote button within the active learn mode period (usually within 30 seconds).
- Button Not Working: If the learn button doesn’t seem to activate learn mode (no indicator light, etc.), it might be faulty. In this case, you may need to consult a technician.
4. Compatibility:
- Frequency: Ensure your car’s transmitter and the Linear garage door opener are compatible in terms of frequency and coding. Most modern systems use rolling code technology for security, which should be compatible, but older systems might have frequency mismatches. Refer to your manuals to confirm compatibility if you suspect issues.
Deleting a Programmed Device (Clearing Memory)
If you need to delete all programmed devices from your Linear garage door opener (for example, if you are moving or concerned about security), you can usually clear the memory. The process varies slightly by model, but generally involves:
- Locate Learn Button: Find the learn button on the motor unit.
- Press and Hold Learn Button: Press and hold the learn button for an extended period, usually 6-10 seconds or more.
- Observe Indicator Light: The indicator light might flash rapidly or turn off and then on to indicate the memory has been cleared.
- Test: After clearing, test any previously programmed remotes or your car. They should no longer operate the garage door.
Important: Clearing the memory will erase all programmed devices. You will need to reprogram any remotes or your car that you want to use again. Refer to your Linear garage door opener manual for the exact deletion procedure for your model.
Enjoy the Convenience
Programming your Linear garage door opener to your car is a simple yet impactful way to enhance your daily convenience. No more searching for remotes or getting caught in the rain while opening the garage. With a few easy steps, you can control your garage door directly from your car, making your life a little easier and more automated.
If you encounter any difficulties or have further questions, don’t hesitate to consult your Linear garage door opener manual or contact a professional garage door service like My Garage And Gates for expert assistance.
FAQs
How do I know if my car has a built-in garage door opener system?
Check your car’s owner’s manual for sections on “Homelink,” “Car2U,” or “Universal Garage Door Opener.” Look for buttons typically located on the rearview mirror, visor, or overhead console, often depicted with a house or garage door icon.
What if my Linear garage door opener doesn’t have a learn button?
While rare on modern openers, older models might not have a learn button. In such cases, programming might involve DIP switches or other methods. Consult your specific Linear garage door opener manual or contact customer support for guidance on older models.
Can I program multiple cars to the same garage door opener?
Yes, you can program multiple cars (and remotes) to a single Linear garage door opener. Just repeat the programming process for each car, using a different button in each car if desired. The opener’s memory can typically store multiple codes.
Is it safe to program my garage door to my car? What about security?
Modern garage door openers and car systems use rolling code technology, which changes the access code every time the remote is used. This significantly enhances security and prevents code theft. Programming your car is generally as secure as using a standard remote.
What does it mean if my garage door opener has a yellow, red, orange, or purple learn button? Does the color matter?
The color of the learn button often indicates the type of security system or frequency used by the garage door opener. While the color itself doesn’t directly affect the programming process described in this guide, it can be relevant when ordering replacement remotes to ensure compatibility. Yellow/purple buttons are common for Security+ 2.0 systems, red/orange buttons for older Security+ systems, for example. Always confirm compatibility based on your model and manual.