Ensuring the safety and well-being of K9 partners is paramount for law enforcement and canine handlers. Advanced K9 car alarm systems, like those from AceK9, offer critical features such as temperature monitoring and remote door operation. A key component of these systems is the remote control, which allows handlers to manage these features efficiently. Understanding how to program your K9 car alarm remote is essential for optimal functionality and seamless operation. This guide will provide a general overview of the programming process, ensuring you can effectively manage your K9 safety system.
Understanding Your K9 Car Alarm System Remote
K9 car alarm systems often come with sophisticated remotes that control various functions beyond just arming and disarming. These can include features like door popping mechanisms, temperature alerts, and even integration with smartphone monitoring systems like AceWatchDog™. Before attempting to program your remote, it’s important to identify the type of remote you have and the specific functions it controls. Typically, remotes will have buttons for:
- Arming/Disarming: Activating or deactivating the alarm system.
- Door Pop: Remotely opening the K9 door.
- Auxiliary Functions: These could be for features like siren activation or triggering light bars, depending on your system.
Refer to your system’s user manual for a detailed layout of your remote and its functions. AceK9 systems, for example, are known for their feature-rich remotes designed for ease of use and comprehensive control.
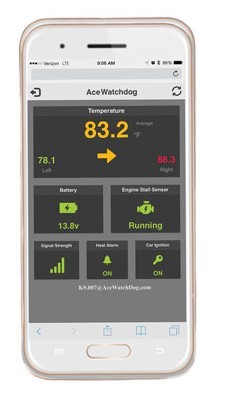 AceWatchDog Smartphone Interface for K9 Car Alarm Remote Monitoring
General Steps to Program a K9 Car Alarm Remote
While specific programming steps can vary between manufacturers and models, the general process for how to program a K9 car alarm remote often involves these common stages:
-
Enter Programming Mode: This usually involves turning the vehicle ignition ON and OFF in a specific sequence, or pressing and holding a programming button located on the alarm module itself. Consult your user manual for the exact sequence for your K9 car alarm system. Some systems may require opening and closing the vehicle door as part of this sequence.
-
Remote Activation: Once in programming mode, you typically need to press a specific button or combination of buttons on the remote you wish to program. This action transmits a signal to the alarm system, registering the remote’s unique code. You may need to do this for each remote you want to program.
-
Confirmation: The system usually provides a confirmation signal, such as a beep from the siren or a flashing light, to indicate that the remote has been successfully programmed. If you don’t receive confirmation, repeat the process, ensuring you are following the correct steps outlined in your manual.
-
Exit Programming Mode: Programming mode is usually exited by turning the ignition OFF again. Once exited, test each programmed remote to ensure it is functioning correctly with your K9 car alarm system.
It’s crucial to always refer to your K9 car alarm system’s user manual for precise instructions. Manufacturers like AceK9 often provide video tutorials and detailed guides for their specific products, such as the HOT-N-POP® PRO and K9 HEAT ALARM® PRO systems. These resources are invaluable for accurate programming and troubleshooting.
Troubleshooting Common Remote Programming Issues
If you encounter difficulties while learning how to program your K9 car alarm remote, consider these common troubleshooting steps:
- Check Battery: Ensure the remote battery is not depleted. A low battery can prevent the remote from transmitting a strong enough signal to be programmed. Replace the battery and try again.
- Programming Mode Entry: Double-check that you are correctly entering programming mode. The ignition sequence or button presses must be precise.
- Proximity: Ensure you are within the effective range of the alarm system when programming the remote. Being too far away can hinder signal transmission.
- Interference: In rare cases, strong radio frequency interference can disrupt the programming process. Try programming in a different location if you suspect interference.
- User Manual Review: Re-read the programming section of your user manual carefully. Small details in the procedure can be critical.
- Contact Support: If all else fails, contact the manufacturer’s customer support. AceK9, and other reputable brands, offer customer service to assist with programming and technical issues.
Advanced Features and Considerations
Some advanced K9 car alarm systems offer additional programmable features through the remote. These might include customizing siren sounds, adjusting sensor sensitivity, or configuring auxiliary outputs. Exploring these options in your user manual can further enhance your system’s functionality and tailor it to your specific needs. For instance, features like the “Forget Me Not” CAR ON / MANUAL OFF feature in AceK9 systems, while not directly programmed via the remote, are crucial settings that complement remote operation for enhanced K9 safety.
Conclusion
Mastering how to program your K9 car alarm remote is a fundamental skill for anyone utilizing these advanced safety systems. By understanding the general steps, consulting your user manual, and troubleshooting common issues, you can ensure your remote operates seamlessly, providing reliable control over your K9 car alarm system and ultimately contributing to the safety and well-being of your canine partner. Always prioritize referring to your specific system’s documentation and seeking manufacturer support when needed for the most accurate and effective programming experience.