Modern vehicles equipped with HomeLink offer the convenience of operating your garage door directly from your car’s rearview mirror or visor. This built-in system eliminates the need for a separate garage door remote, reducing clutter and the risk of losing or misplacing it. Programming your car’s HomeLink to your garage door opener is a straightforward process that can be completed in just a few steps. This guide will walk you through each stage, ensuring you can effortlessly control your garage door with your car’s integrated remote.
Step-by-Step Guide to Programming Your Car Mirror Remote
Here’s a detailed breakdown of how to program your car’s mirror remote to your garage door opener.
Step 1: Position Your Vehicle Correctly
Begin by parking your car in front of your garage. For optimal signal reception during programming, position your vehicle approximately within 5 feet of the garage door. While programming inside the garage is also possible if you have access to the garage door opener, starting outside with the door closed is generally recommended, as you will need to access the opener unit later.
Step 2: Clear the Existing HomeLink Memory
Before programming your car mirror remote to a new garage door opener, it’s crucial to clear any previously saved settings. This is particularly important if you’ve purchased a used vehicle, as it might still retain the previous owner’s garage door programming. Clearing the memory ensures a clean slate for your new programming.
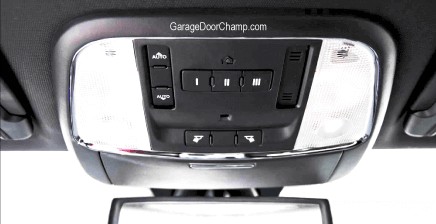
To clear the HomeLink memory, locate the HomeLink buttons, typically situated on the rearview mirror’s underside or on the sun visor.
Simultaneously press and hold the two outermost HomeLink buttons (usually buttons #1 and #3) for about 10 to 20 seconds. Keep holding until the HomeLink indicator light starts flashing rapidly. This rapid flashing confirms that the memory has been successfully cleared. In some car models, the indicator light might change color instead of flashing rapidly to signal completion. To verify the memory is cleared, briefly press and hold any of the HomeLink buttons individually. If the indicator light flashes slowly, it indicates no previous programming is present.
Step 3: Program a HomeLink Button with Your Garage Door Remote
Once the memory is cleared, you’re ready to program a specific HomeLink button to your garage door opener. Ensure your car is still parked close to the garage and that you have your garage door’s handheld remote control. Keep your car’s ignition turned on, but the engine can be off.
Press and hold the button on your garage door remote that you typically use to open the door. Simultaneously, press and hold the HomeLink button in your car that you want to program to the garage door. Continue holding both buttons until the HomeLink indicator light in your car changes from a slow flash to a rapid flash. This change in flashing speed indicates that the HomeLink button has successfully learned the frequency signal from your garage door remote.
Step 4: Activate the “Learn” Button on Your Garage Door Opener Unit
After programming the HomeLink button in your car, you need to sync it with your actual garage door opener unit. Locate the “Learn” button on your garage door opener motor unit inside your garage.
The “Learn” button is usually found on the back panel or side of the garage door opener motor, often near the antenna wire. The appearance and location can vary slightly depending on the model, but it’s typically a colored button (often yellow, red, orange, or purple). Press and immediately release the “Learn” button. Once pressed, a small LED indicator light on the garage door opener will usually illuminate or flash, indicating it’s in learning mode.
Note: This step is crucial for modern garage door openers that use rolling code technology. Older openers might use DIP switches and may not require this step.
Step 5: Sync Your Car Mirror Remote with the Garage Door Opener
Return to your car quickly after pressing the “Learn” button on the garage door opener. Press and hold the programmed HomeLink button in your car for two to three seconds, and then release it. Repeat this press-and-release process a second and possibly a third time. Watch your garage door closely after each press. In most cases, the garage door will activate and begin to open or close during this syncing process. This movement confirms that your car mirror remote is now successfully programmed and synced with your garage door opener.
Troubleshooting Common Programming Issues
Encountering difficulties while programming your car mirror remote is not uncommon. Here are a few troubleshooting tips:
- Distance Adjustment: If the programming isn’t working initially, try slightly adjusting the distance between your car’s rearview mirror and your handheld garage door remote during Step 3. A minor change in proximity can sometimes improve signal reception. Ensure your car remains within a close range (about 5 feet) of the garage door throughout the process.
- External Receiver: If your garage door system uses an external receiver, you should program your car’s HomeLink to this receiver unit instead of the main garage door opener. The programming steps remain the same.
- Compatibility Bridge for Older Cars with Newer Openers: If you have a Liftmaster, Chamberlain, or Craftsman garage door opener with a yellow “Learn” button and your car was manufactured before 2013, direct programming might not be possible. These older cars often require a compatibility bridge or repeater. You would program your car to this repeater following the standard steps, and the repeater communicates with the newer garage door opener.
- Repeat the Process and Check Manuals: Sometimes, simply repeating the programming steps can resolve the issue. Also, consult your car’s owner’s manual for specific HomeLink programming instructions for your vehicle model, as there might be slight variations. Refer to your garage door opener manual as well.
- Battery Check: Ensure the batteries in your garage door remote are not low, as weak batteries can hinder the programming process.
- Professional Assistance: If you’ve tried these troubleshooting steps and are still unable to program your car mirror remote, it’s possible there might be an issue with your car’s HomeLink system or the garage door opener itself. Consider contacting a certified garage door repair service for professional diagnosis and assistance.
Frequently Asked Questions (FAQ)
Can you program your car mirror remote without a handheld remote?
No, you typically need a working handheld remote for your garage door opener to program your car’s HomeLink system. The HomeLink system learns the signal from your existing remote.
What should I do if my car mirror remote won’t program to the garage door opener?
First, double-check the compatibility of your car and garage door opener, especially if you have an older vehicle and a newer opener. Review the troubleshooting tips above, ensuring correct distance, battery strength, and attempting the process again. If issues persist, consult your car’s manual or seek professional garage door service.
How close does my car need to be to the garage door when programming the mirror remote?
For successful programming, position your car approximately 5 feet or closer to the garage door. Proximity ensures a strong signal during the learning process.
This guide provides comprehensive steps and troubleshooting advice to help you program your car mirror remote for your garage door. Enjoy the convenience of integrated garage door control from your vehicle!