So, your automatic car starter, also known as a remote car starter, has stopped working? Before you rush to the dealership or an auto shop, you might be able to fix it yourself. Many car owners experience issues with their remote starters, often due to simple problems like battery issues or needing to reprogram the remote. The Drive’s expert How-To department is here to guide you through the process of how to program your automatic car starter and get it working again.
While modern cars (generally five years old or newer) often require a dealership visit for key fob reprogramming due to security complexities, older vehicles and aftermarket systems are frequently programmable at home. Automakers, unfortunately, haven’t standardized the programming steps for remote key fobs, which can make things a bit confusing. Your owner’s manual is the best first stop for specific instructions. You can also check websites like ProgramYourRemote.com which compiles programming procedures for various makes and models. Entering programming mode usually involves a specific sequence of actions, often involving turning the ignition key to the Accessory mode (the position that powers the radio and accessories without starting the engine) multiple times, combined with other steps.
If you’ve searched for specific instructions for your car or aftermarket remote start system and are still unsure, don’t worry. We’ve put together some general tips and a step-by-step guide on how to program your automatic car starter, covering common methods to try.
Understanding the Basics of Automatic Car Starter Programming
Estimated Time Needed: 15-30 minutes
Skill Level: Beginner
Vehicle System: Ignition and Security System
Understanding the basics is key to successfully program your car remote.
Safety First
Working on your car, even for simple tasks like remote programming, requires caution. Prioritize your safety to prevent any accidents or injuries.
Safety should always be your top priority when working on your vehicle.
Tools and Parts You Might Need
For most remote car starter programming attempts, you won’t need specialized tools. Here’s a basic list of what you might require:
Tool List
- Your car keys (including the key fob you want to program)
Parts List
- New battery for your key fob (check your owner’s manual for the correct type, often CR2032 or similar)
Make sure you have a safe and convenient workspace, such as your driveway or garage. If you’re working on the street, be aware of local parking regulations.
Having everything organized will make the process smoother and faster.
Preparing Your Workspace
A well-organized workspace makes any DIY task easier and more efficient. Having your key fobs and potentially a new battery within reach will save you time and frustration.
A clean and organized workspace enhances efficiency and safety.
Step-by-Step Guide: How To Program Your Automatic Car Starter
Let’s get started with the troubleshooting and programming process.
Method 1: The Battery Reset – Simple First Steps
Sometimes, a simple battery reset can resolve minor glitches in your remote starter system.
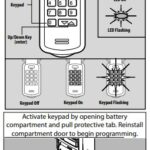
- Open the Remote Fob: Locate the small notch or opening on your remote car starter fob and gently pry it open. You might need a small flathead screwdriver or a coin for this.
- Remove the Battery: Carefully take out the battery. Note the orientation (+ and – sides) before removing it.
- Wait and Reset: Wait for about 15-20 seconds. This allows the remote to fully discharge and reset its internal memory.
- Reinstall the Battery: Put the battery back in, ensuring correct polarity.
- Close the Fob: Snap the remote fob cover back into place until it’s securely closed.
- Test: Try using your remote starter. If it works, you’ve solved the problem with a quick reset! If not, proceed to the next steps.
Method 2: Battery Check and Replacement
A weak or dead battery is a common culprit for remote starter issues.
- Check with a Spare Remote (If Available): If you have a second remote start fob that is working correctly, use it to test your car’s remote start system. If the spare works, the problem is likely with the first remote.
- Battery Swap Test: If you suspect a battery issue with the non-working remote, and you have a spare working remote, try swapping the batteries between the two remotes.
- Test Again: After swapping, test both remotes. If the problem moves to the other remote after the swap, you’ve confirmed a faulty battery.
- Replace the Battery: Purchase a new battery of the correct type for your remote. These are readily available at most drugstores, supermarkets, and online retailers. Replace the old battery with the new one.
- Test the Repaired Remote: Try using the remote with the new battery. If it now works, a simple battery replacement was all you needed. If not, move on to reprogramming.
Method 3: Reprogramming Your Remote Starter – The General Procedure
If battery checks and resets haven’t worked, you’ll need to try reprogramming your remote car starter. Here’s a general procedure that works for many vehicles and aftermarket systems. However, always prioritize checking your owner’s manual or ProgramYourRemote.com for your specific car model’s instructions, as steps can vary.
- Gather Your Remotes: Collect all remote start fobs you intend to program to your vehicle. You will typically need to program all of them at the same time.
- Get in the Driver’s Seat and Close the Door: Ensure you are in the driver’s seat and the driver’s side door is completely closed.
- Ignition to Accessory Mode: Insert your ignition key into the ignition switch. Turn the key to the “Accessory” position. This is usually one click forward from the “Off” position. If your car has a start button, press it once without pressing the brake pedal to enter Accessory mode.
- Press the Lock Button (or as instructed): On one of your remote car starters, press the “Lock” or “Start” button (refer to your specific instructions).
- Cycle Ignition On and Off: Within 5 seconds of pressing the button on the remote, turn the ignition key back to the “Off” position (or press the start button again to turn the car off).
- Repeat the Cycle: Repeat the “Accessory to Off” ignition cycle (steps 4 and 5) three more times, for a total of four cycles.
- Programming Mode Confirmation: On the fourth cycle, when you turn the key to the Accessory position, you should hear a sound – a chime, ding, buzz, or the car locks cycling. This sound indicates that your vehicle has entered programming mode.
- Program the Remotes: Immediately after hearing the confirmation sound, press and hold the “Lock” or “Start” button on each remote you want to program, one after another. There might be a sound or visual cue (like flashing parking lights) to confirm each remote is programmed.
- Exit Programming Mode: Turn the ignition key to the “Off” position or press the start button to turn off the car. This should exit programming mode.
- Test Your Remotes: Step out of the car, close the door, and test each remote to ensure they are now working correctly.
If your remote car starter is now functioning, congratulations! You’ve successfully programmed your remote. If it still doesn’t work after these steps, it might be time to consider professional help.
Testing your remote after programming is crucial to ensure it works.
Pro Tips for Automatic Car Starter Programming
From our years of experience at The Drive, we’ve learned a few helpful tips when dealing with remote starters:
- Battery First, Always: As mentioned, battery issues are the most frequent cause of remote problems. Always start by checking and replacing the battery. It’s the simplest and cheapest fix. Consider buying batteries in bulk online to save money in the long run.
- Read the Manual: We can’t stress this enough. Your vehicle’s owner’s manual is the best source for specific programming instructions. Aftermarket remote start systems also come with their own manuals. Keep them in a safe place!
- Timing is Key: Programming sequences often require precise timing. Make sure to perform the steps within the specified timeframes mentioned in your manual or online guides.
- Listen for Confirmation: Pay close attention for any sounds (chimes, beeps, lock cycling) or visual cues (flashing lights) that indicate when you’ve successfully entered programming mode or when a remote has been programmed.
Useful Life Hacks for Remote Starters
Here’s a fun life hack that you might find surprisingly effective:
- The Chin Trick for Range: Need a little extra range from your remote? Hold the remote under your chin when pressing the button. Your head and body act as an antenna, potentially increasing the signal range.
Featured Aftermarket Remote Start Products
If you’re considering upgrading or replacing your existing remote start system, here are a few popular aftermarket options:
- Viper 5706V 2-Way Car Security with Remote Start System: Check on Amazon – Known for its reliability and 2-way communication, offering confirmation when your car starts.
- Crimestopper RS4-G5 1-Way Remote Start and Keyless Entry System with Trunk Pop: Check on Amazon – A budget-friendly option offering remote start and keyless entry features.
- Compustar 1-Way Remote Start and Keyless Entry: Check on Amazon – A reliable and simple 1-way remote start system with good range.
Have more questions or pro tips about programming your automatic car starter? Reach out to us at [email protected]
Get Equipped for Success
Our team at The Drive is dedicated to providing hands-on knowledge and gear recommendations to help you master car DIY and maintenance.
EXPLORE MORE GUIDES