Gaining access to your apartment complex should be seamless and secure. For residents with gated entrances, apartment gate remotes are a daily essential. Imagine the convenience of accessing your apartment gate without fumbling for a separate remote – directly from your car. This article will guide you through the process of programming your apartment gate remote to your car, enhancing your daily convenience and security.
Understanding Apartment Gate Remote Programming
Before we delve into the steps, let’s understand the basics. Programming your gate remote involves syncing it with the gate’s receiver unit. This receiver, located near the gate, communicates with your remote, triggering the gate to open or close. Think of it as establishing a unique language between your remote and the gate system.
There are two main types of gate remotes you might encounter:
- Dip Switch Remotes (Fixed Code): These remotes use a series of tiny switches (dips) inside the remote and receiver. Programming involves matching the switch positions on both devices.
- Rolling Code Remotes (Learning Code): These more modern remotes transmit a unique code that changes with each use, enhancing security. Programming typically involves pressing a ‘Learn’ button on the receiver and then activating the remote.
Understanding which type of remote you have is the first step to successful programming.
Why Program Your Gate Remote to Your Car?
Programming your apartment gate remote to your car offers several significant advantages:
- Convenience: No more juggling multiple remotes. Operate your gate directly from your car’s built-inHomelink or compatible system.
- Enhanced Security: Reduce the risk of losing or misplacing a separate remote. Having it integrated into your car makes it less likely to be lost or stolen.
- Streamlined Access: Arrive at your apartment gate and open it with the press of a button on your dashboard – just like a built-in garage door opener.
- Modern Integration: Utilize your car’s technology to control access to your residence, bringing a touch of modern convenience to your daily routine.
Now that you understand the benefits, let’s explore the tools you’ll need.
Essential Tools for Programming
To program your apartment gate remote, gather these common tools:
- Screwdriver: May be needed to open remote or receiver casing to access dip switches or programming buttons.
- Your Gate Remote: The remote you intend to program to your car. Ensure it has working batteries.
- Vehicle’s User Manual: Crucial for understanding your car’s specific built-in remote programming procedures (if applicable).
- Apartment Gate Receiver Access: You may need access to the gate receiver unit, typically located near the gate mechanism.
- New Batteries (Optional): If your remote’s batteries are old, consider replacing them to ensure a strong signal during programming.
For specific apartment gate systems, you might need additional tools or information. Always refer to your gate remote and system documentation if available.
Step-by-Step Guide: Programming Your Apartment Gate Remote
Let’s break down the programming process into manageable steps. First, you need to identify the type of remote you have.
Identifying Your Gate Remote Type
Before you start programming, determine if you have a dip switch (fixed code) or rolling code remote.
-
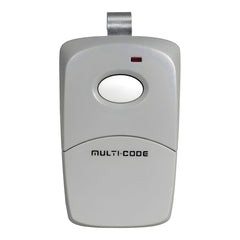
Dip Switch Remote Identification: These remotes often have the brand names like Multicode or Linear. You might need to open the remote casing (usually battery compartment) to see small switches in a row.
-
Rolling Code Remote Identification: These remotes are more common in newer systems and often have a ‘Learn’ button on the receiver. Brands like LiftMaster or Elite are often rolling code. They generally don’t have easily accessible dip switches.
If you are unsure, check your remote’s manual or contact your apartment complex management for details about your gate system and remote type. Identifying the correct type is crucial for following the right programming procedure.
Programming Dip Switch (Fixed Code) Remotes to Your Car
Programming a dip switch remote involves mimicking the remote’s signal using your car’s built-in system. Here’s how:
- Ensure Your Remote Works: Verify that your gate remote is currently functioning and opening the gate.
- Locate Car Programming Buttons: Consult your vehicle’s owner manual to find the location of the built-in remote programming buttons. These are often on the rearview mirror, visor, or overhead console.
- Clear Existing Car Codes (If Needed): Some cars require you to clear existing codes before programming new ones. This is usually done by pressing and holding the outer two car remote buttons for about 20-30 seconds until the indicator light flashes rapidly. Refer to your car manual for specific instructions.
- Simultaneous Programming:
- Hold your working gate remote close to the car’s receiver (usually near the programming buttons).
- Press and hold the button on your gate remote that you typically use to open the gate.
- At the same time, press and hold the car’s built-in remote button you want to program.
- Keep both buttons pressed until the indicator light on your car’s system flashes rapidly or changes in a way that indicates successful programming (refer to your car manual). This might take between a few seconds to a minute.
- Test: Press the programmed button in your car. If your gate opens, you’ve successfully programmed your dip switch remote to your car! If not, repeat the steps, ensuring you are following your car’s manual precisely.
Programming Rolling Code Remotes to Your Car (Two-Step Process)
Rolling code remotes require a slightly more involved, two-step process due to their enhanced security features:
-
Initial Car Programming (Remote Signal Copy):
- Ensure your gate remote is working and has a good battery.
- Locate your car’s programming buttons as described earlier and clear existing codes if necessary.
- Hold your working gate remote close to the car’s programming receiver.
- Press and hold the button on your gate remote and the desired button in your car simultaneously.
- Wait for the indicator light in your car to flash, indicating it has learned the frequency signal from your remote.
-
Receiver ‘Learn’ Button Synchronization:
- Access the Gate Receiver: You will need access to the apartment gate receiver unit. This is usually a box near the gate motor or control panel. You may need permission from apartment management to access this.
- Locate the ‘Learn’ Button: Find the ‘Learn’ or ‘Program’ button on the receiver unit.
- Press the ‘Learn’ Button: Press and release the ‘Learn’ button. An LED indicator light on the receiver should turn on, indicating it is in learning mode. You typically have a short window of time (around 30 seconds) to complete the next step.
- Car Activation: Immediately return to your car and press and hold the car’s built-in button that you programmed in step 1. Hold it until the gate activates or the car’s indicator light confirms programming is complete (this may involve a specific number of flashes – consult your car manual).
- Test: Test the programmed button in your car. Your gate should now open.
This two-step process ensures that the rolling code system recognizes your car’s built-in transmitter as an authorized device.
Troubleshooting Common Programming Issues
Encountering problems while programming is not uncommon. Here are some troubleshooting tips:
- Remote Not Syncing:
- Battery Check: Ensure both your gate remote and car remote system have fresh batteries. Low batteries can weaken signals.
- Proximity: Make sure you are holding the remotes close enough to each other and to the car’s receiver during programming.
- Correct Procedure: Double-check you are following the exact programming steps for your remote type and car model from their respective manuals.
- LED Light Not Blinking:
- Car System Readiness: Ensure your car’s system is in programming mode. If the LED isn’t blinking as expected when you press buttons, you might need to reset the system or try a different programming sequence (refer to car manual).
- Receiver Power: If programming a rolling code and the receiver ‘Learn’ button LED doesn’t light up, check if the gate receiver unit is powered on and functioning correctly.
- Gate Not Responding:
- Range: Ensure you are within the operational range of the gate when testing from your car.
- Code Compatibility: If programming a dip switch remote, re-verify that you have correctly matched the dip switch settings if you attempted to program by manually setting switches. For rolling code, repeat the entire two-step process carefully.
- Factory Reset (Last Resort): If all else fails, you might need to factory reset your car’s remote system and start the programming process again. Consult your car manual for reset instructions.
If you continue to experience issues, consider contacting a professional gate technician or your apartment complex maintenance for assistance.
Maintaining Your Car-Programmed Gate Remote
Once programmed, proper maintenance ensures long-term functionality:
- Regular Testing: Periodically test the programmed car button to ensure it’s still working reliably.
- Battery Awareness: Be mindful of your gate remote’s battery life. Replace batteries proactively if you notice decreased range or responsiveness.
- Avoid Interference: Keep the car’s remote system area clean and free from obstructions that might interfere with signal transmission.
Conclusion
Programming your apartment gate remote to your car is a worthwhile endeavor that significantly enhances convenience and security. By understanding your remote type, following the correct steps, and troubleshooting effectively, you can seamlessly integrate your gate access into your vehicle. Enjoy the ease of opening your apartment gate with just a touch of a button from your car! For a wide selection of gate remotes and further assistance, visit https://elitegates.net/collections/remote-controls.