Programming your Python remote car starter can seem complicated, but by following a step-by-step process, you can easily pair your remote to your vehicle’s system. This guide will walk you through the necessary steps to program your Python remote car starter, ensuring you can utilize the convenience of remote start functionality.
Preparing Your Vehicle for Remote Learning
Before you begin programming your remote, you need to prepare your vehicle to enter remote learning mode. Follow these steps carefully, as timing is crucial for successful programming:
- Open the Driver’s Side Door: Ensure the driver’s side door is open and remains open throughout the programming process.
- Turn the Ignition to the “ON” Position: Insert your key into the ignition and turn it to the “ON” position. This means the car’s electrical system is active, but the engine is not running.
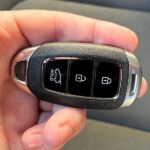
- Press and Release the Valet/Program Button: Within 5 seconds of turning the ignition ON, locate and press the valet/program button one time, and then release it. This button is usually small and may be located under the dashboard or near the fuse box.
- Press and Hold the Valet/Program Button: Immediately after releasing the button in the previous step, press and HOLD the valet/program button again. Keep holding it down. You should observe the LED flashing once, and the siren will chirp. These are confirmation signals that the vehicle is now ready for remote pairing.
- Release the Valet/Programming Button: Once you hear the siren chirp and see the LED flash, release the valet/programming button. The system is now in remote learning mode and ready to pair with your remote.
Programming Your Remote
Now that your vehicle is in remote learning mode, you can program your Python remote. These steps are specific to Python remotes and need to be followed precisely:
- Hold the “F” Button for 8 Seconds: On your Python remote, press and hold the “F” button for 8 seconds. Initially, around 3 seconds, you might hear an alert – ignore this and continue holding the “F” button. Keep holding until the display on the remote shows “MAIN MENU”.
- Release the “F” Button: Once “MAIN MENU” is displayed, release the “F” button. The display will then change to “SETUP REMOTE”.
- Navigate to “PAIR REMOTE”: Use the navigation buttons on your remote to scroll through the menu options. Pressing the “AUX” button typically steps up through the menu, while pressing the clockwise rotating arrow button with a center dot steps down. Navigate until you see “PAIR REMOTE” displayed on the screen.
- Select “PAIR REMOTE”: When “PAIR REMOTE” is displayed, press and HOLD the “F” button for 1 second. The remote will emit 3 short beeps, and the display will show “PAIR”, indicating it’s ready to pair with the vehicle.
- Press the “LOCK” Button to Learn: Within 5 seconds of the remote displaying “PAIR”, press the “LOCK” button on your remote. If the programming is successful, the vehicle’s siren will sound, confirming that the remote has been successfully learned by the system.
- Exit the Main Menu: After successful learning, press the “F” button one time to exit the “MAIN MENU”.
- Navigate to “EXIT”: Use the clockwise rotating arrow button with a center dot and press it two times until “EXIT” is displayed on the remote screen.
- Final Exit: Press the “F” button one last time to exit the programming mode completely.
During these programming procedures, always pay attention to the siren chirps and remote display changes. These are crucial indicators of whether the process is working correctly. Timing is critical, and you may need to repeat these steps a few times to achieve successful programming. If you are still facing issues, consider trying with another remote if you have a spare, or consulting the user manual for your specific Python remote car starter system. If problems persist, seeking professional assistance from a car audio specialist might be necessary.