Programming your LiftMaster garage door opener to your car’s built-in system, like HomeLink, offers unparalleled convenience. No more fumbling for a separate remote – simply press a button in your car, and you’re in. While LiftMaster P3 models are designed for user-friendliness, understanding the programming process is key to a smooth setup. This guide will walk you through each step, ensuring you can effortlessly integrate your garage door opener with your vehicle.
1. Access the Learn Button on Your LiftMaster Opener
The first crucial step is locating the “learn” button on your LiftMaster garage door opener unit. This unit is typically mounted on the ceiling of your garage, directly connected to the door mechanism.
To access it safely:
- Use a sturdy ladder: Position your ladder securely beneath the opener unit, ensuring it’s stable before you climb.
- Locate the control panel: Once you can reach the unit, look for a panel on the back or side of the opener. This panel houses the programming buttons. Open this panel to proceed.
- Identify the Learn Button: The learn button is distinct and usually labeled clearly. LiftMaster uses different colors for these buttons depending on the model’s security type. You might find:
- Red, Orange, Green, or Purple square button: These are common in older and some newer models.
- Yellow circular button: Frequently found on more recent LiftMaster openers, often associated with Security+ 2.0 technology.
Learn Button Location on Garage Door Opener
Alt text: Close-up view of a LiftMaster garage door opener control panel highlighting the yellow circular learn button.
2. Activate the Learn Mode
Once you’ve located the learn button, you need to activate the opener’s “learn mode.” This mode makes the unit receptive to new programming signals for a short period.
- Press and Hold: Press and hold the learn button.
- Observe the LED Indicator: When you press the button, an LED indicator light near the button should illuminate. Hold the button until this light turns off. This usually takes just a few seconds.
- Programming Window: After the LED light goes out, the garage door opener is in learn mode and ready to be programmed. This mode typically lasts for about 30 seconds, giving you a limited window to complete the next steps.
3. Prepare Your Car’s HomeLink System
Now, turn your attention to your vehicle’s HomeLink system. HomeLink is a widely adopted car-to-home automation system that allows you to control garage doors, gates, and other compatible devices directly from your car.
- Locate HomeLink Buttons: HomeLink buttons are usually found on the rearview mirror, visor, or overhead console of your car. They are typically labeled with a house icon or the word “HomeLink.”
- Choose a Button: HomeLink systems usually have three buttons. Decide which button you want to program to control your LiftMaster garage door.
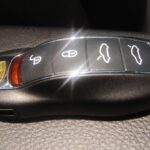
Car HomeLink Buttons
Alt text: Interior car view showing three HomeLink buttons located on the rearview mirror, used for garage door and smart home device control.
4. Program HomeLink with the Learn Signal
With your LiftMaster opener in learn mode and your HomeLink system ready, you can now link them together.
- Simultaneous Button Press: Press and hold the chosen HomeLink button in your car and, at the same time, press the learn button on your LiftMaster garage door opener again briefly and release.
- Watch for Blinking Lights: Observe the indicator light on your HomeLink button. It should start blinking slowly at first. Continue holding the HomeLink button until the indicator light begins to blink rapidly. This rapid blinking indicates that the HomeLink system has successfully received the programming signal from the garage door opener.
- Confirmation: Once the HomeLink light blinks rapidly and then often becomes a solid light, the connection is typically complete.
5. Test the Connection and Troubleshoot
The final step is to test if the programming was successful and troubleshoot if needed.
- Test the HomeLink Button: Press the programmed HomeLink button in your car.
- Garage Door Response: Your garage door should begin to open or close within a few seconds. If it does, congratulations! You have successfully programmed your LiftMaster P3 garage door opener to your car.
- Troubleshooting: If the garage door doesn’t respond:
- Repeat the Process: Sometimes, the programming doesn’t take on the first try. Repeat steps 1 through 4 carefully.
- Check Learn Mode Timeout: Ensure you are pressing the HomeLink button within the 30-second learn mode window after activating the learn button on the opener.
- Remote Compatibility: In some rare cases, older HomeLink systems might require an intermediary step using the garage door opener’s remote control first. Consult your HomeLink and LiftMaster manuals for specific compatibility notes if issues persist.
- HomeLink Reset: If you are still having trouble, you might need to clear any previous programming from your HomeLink system. Refer to your vehicle’s owner’s manual for instructions on how to reset your HomeLink system.
By following these steps, you should be able to easily program your LiftMaster P3 garage door opener to your car’s HomeLink system, enjoying the convenience of seamless garage access. Always refer to your LiftMaster and vehicle manuals for model-specific instructions and safety precautions.