Many drivers find the factory setting of a reverse camera, which only activates when the vehicle is in reverse, to be limiting. Imagine the convenience of using your reverse camera at any time, providing an extended rear view while driving forward. Good news for owners of certain truck models: you absolutely can modify your reverse camera to be always on. This guide will walk you through a straightforward modification to achieve just that, enhancing your driving visibility and safety.
This modification is designed for specific vehicle models, particularly the +’09 truck series mentioned in the original guide. It involves a simple wiring change that allows you to manually activate your reverse camera whenever desired, regardless of whether your truck is in reverse gear. This means you can use your rearview screen to monitor trailers, check on cargo, or simply have a wider field of vision behind you while driving down the road.
To perform this modification, you will need a few readily available components and basic wiring skills. Let’s gather the necessary supplies to get started.
What You’ll Need for the Always-On Reverse Camera Mod
Before you begin, ensure you have the following items on hand. These are easily obtainable from any automotive parts store or online retailer.
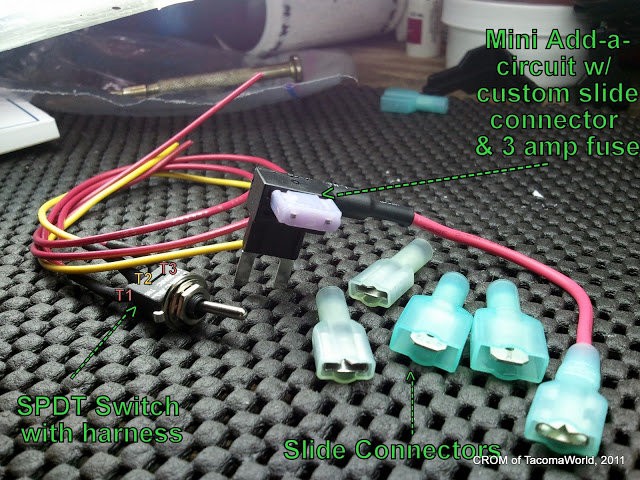
- (1) SPDT Switch: A Single Pole Double Throw switch is the heart of this modification, allowing you to toggle between the factory setting and the always-on mode.
- (3) Pieces of 10″ Hookup Wire: These wires will be used to create your custom harness to connect the switch.
- (3) Male Slide Connectors & (3) Female Slide Connectors: These connectors will allow for easy and secure connections within your vehicle’s wiring system, making the modification reversible if needed.
- (1) Add-a-circuit with Appropriate ATM Fuse (3 amp) and Matching ATM Fuse: An add-a-circuit safely taps into your truck’s existing fuse box to provide power for the always-on camera feature without overloading circuits. Make sure to get the correct ATM fuse type and amperage.
- Heat Shrink Tubing: To insulate and protect your switch terminals and wiring connections, ensuring a durable and safe modification.
Once you have gathered all the necessary supplies, you’re ready to move on to the step-by-step installation process.
Step-by-Step Guide to Make Your Reverse Camera Always On
This modification is designed to be relatively simple, especially for those with some basic automotive electrical knowledge. Follow these steps carefully to enable your reverse camera to be activated at any time.
1. Prepare the Switch Harness
Begin by preparing the switch. Solder or crimp the hookup wires to the terminals of your SPDT switch. As mentioned in the original guide, the center terminal (T2) of the SPDT switch will connect to the camera wire. The other two terminals (T1 and T3) will connect to the reverse wire and the add-a-circuit. It’s recommended to use different colored wires for clarity, such as yellow for T2 (camera), and red for T1 and T3 (power sources). Using heat shrink tubing to insulate the connections at the switch terminals is a good safety practice.
For added protection and a cleaner look, consider using split-wire loom to encase your newly created harness. This will protect the wires from abrasion and the elements within the vehicle’s dashboard.
2. Access the Wiring and Mount the Switch
Locate the coin tray area on your dashboard, as this is typically a convenient location to access the necessary wiring and mount your switch. Remove the coin tray to gain access behind the dash. Identify a suitable spot to install your SPDT switch. Ensure there is enough space behind the chosen location for the switch and its wiring without interfering with other components.
Next, you’ll need to find the correct connector, often referred to as connector IN1. Be aware that the appearance of this connector and the number of wires it contains can vary depending on your truck’s specific factory options and accessories. Locate the Rev wire within this connector. This wire is responsible for activating the reverse camera when the vehicle is shifted into reverse.
Refer to the wiring diagrams and potentially your vehicle’s service manual to accurately identify the Rev wire. In some models, it may be visually identifiable by its color, as shown in the following image.
3. Connect the Switch
Once you’ve located the Rev wire, carefully remove some of the factory insulation around it. Cut the Rev wire and attach male slide connectors to both cut ends. Now, connect female slide connectors to the wires of your switch harness.
Connect the center terminal wire (T2, yellow wire in our example) from your switch harness to the camera side of the cut Rev wire (the end going towards the camera, not the source). Connect one of the other switch terminal wires (T1 or T3, red wire in our example) to the other end of the cut Rev wire (the source side).
Route the remaining wire from your switch harness towards the fuse box. Install the add-a-circuit into an appropriate fuse slot in your truck’s fuse box. Important: Consult the instructions that come with your add-a-circuit to choose a suitable fuse location and ensure correct installation. Connect the last wire from your switch harness (T3 or T1, red wire) to the add-a-circuit.
Securely mount the SPDT switch in your chosen location on the dash.
4. Test and Finalize
Before fully reassembling your dashboard, test the modification. With the truck running, toggle the SPDT switch to its different positions. In one position, the reverse camera should function as it did from the factory, only activating when in reverse. In the other position, the reverse camera should be always on, regardless of the gear you are in.
Once you’ve confirmed that the modification is working correctly, neatly arrange the wiring and secure it to prevent rattling or interference. Reinstall the coin tray and any other dashboard components you removed. Ensure all connections are secure and well-insulated for long-term reliability.
Finally, tidy up the wiring behind the dash for a clean and professional finish.
Conclusion
Congratulations! You have successfully modified your reverse camera to be always-on. This simple modification can significantly enhance your driving experience by providing constant rear visibility. Remember to always drive responsibly and use this modification to improve safety and awareness, especially when towing or navigating tight spaces.
Disclaimer: Modifying your vehicle’s electrical system carries risks. Perform this modification at your own risk. If you are not comfortable working with automotive electrical systems, it is recommended to seek professional installation.