Imagine the ease of simply pressing a button in your car to open your gate as you arrive home, a seamless transition without fumbling for a separate remote. Programming your gate opener to work with your car offers unparalleled convenience and enhanced security. This guide will walk you through the process of integrating your gate remote with your vehicle, ensuring smooth access to your property with just the touch of a button within your car.
Understanding the Basics of Gate Opener Programming
Before diving into the programming process, it’s helpful to understand the fundamentals of how gate openers and their remotes communicate. At its core, gate remote programming is about establishing a communication link between your handheld remote and the receiver unit connected to your gate. This link allows your remote to send signals that instruct the gate to open or close.
Two key components are at play:
- The Receiver Unit: This is the “brain” of your gate system, typically a small box located near your gate motor. It’s responsible for receiving the signals from your remote and translating them into actions that operate the gate.
- The Remote Transmitter: This is the handheld device you use to send commands to the receiver. When you press a button, it transmits a coded signal.
The effectiveness of your gate remote system hinges on proper programming, ensuring a secure and reliable connection between these two components.
Why Program Your Gate Opener to Your Car?
Integrating your gate opener remote into your car offers several compelling advantages:
- Ultimate Convenience: No more searching for a separate remote in your glove compartment or on your visor. Operation becomes integrated and effortless, right from your car’s dashboard.
- Enhanced Security: By embedding the gate control within your car, you reduce the risk of losing or misplacing a separate remote. It also streamlines your entry process, minimizing wait times and potential security vulnerabilities.
- Streamlined Routine: Simplify your daily comings and goings. With integrated control, opening your gate becomes a natural part of your driving routine, just like adjusting your mirrors or turning on your headlights.
Programming your gate opener to your car is about making your life easier, more secure, and more streamlined.
Essential Tools for Programming Your Gate Remote
Before you begin, gather the necessary tools to ensure a smooth programming experience. While the exact tools may vary slightly depending on your gate and car models, you’ll generally need:
- Screwdriver: Possibly a Phillips or flathead screwdriver, depending on the type of screws used to access the receiver unit or remote battery compartment.
- User Manuals: Crucially important! Have both your gate opener remote’s manual and your car’s owner’s manual readily available. These manuals contain specific instructions for your models and are your best resources.
- Fresh Batteries: If your gate remote is older, consider replacing the batteries before programming to ensure sufficient power during the process.
Some gate opener systems or car integration methods might require additional tools, such as specialized programming adapters. Always consult your user manuals first for any specific requirements. Preparation is key to a successful and frustration-free programming process.
Step-by-Step Guide: Programming Your Gate Remote to Your Car
Let’s move on to the practical steps for programming your gate remote to your car. The process can vary depending on whether you have a fixed-code (dip switch) remote or a rolling code remote, and the type of in-car system you are using.
1. Identify Your Gate Remote and Car System Type
The first crucial step is to determine the type of gate remote you have and the type of system in your car you’ll be programming to.
-
Gate Remote Type:
- Dip Switch (Fixed Code) Remotes: These remotes use a series of tiny switches (dips) inside the remote and receiver to set the security code. Multicode and Linear remotes are common examples.
- Rolling Code Remotes: These remotes use a constantly changing code for enhanced security. Brands like LiftMaster often utilize rolling code technology.
Refer to your gate remote’s manual or the manufacturer’s website to identify your model and type.
-
Car System Type:
- Built-in Universal Home Remote Systems: Many modern cars come equipped with built-in systems like HomeLink® or Car2U®. These systems are designed to learn and operate garage door openers, gate openers, and other home automation devices. Check your car’s owner’s manual for information on whether your car has such a system and how to program it.
Understanding these types will guide you to the correct programming method.
2. Programming Fixed-Code (Dip Switch) Remotes to Your Car
If you have a dip switch remote and are programming it to a compatible car system (or even directly, in some rarer cases), follow these general steps:
- Ensure Your Remote Works: Verify that your dip switch remote is currently working to open your gate before attempting to program it to your car.
- Access Car’s Programming Mode: Consult your car’s owner’s manual for instructions on accessing the programming mode for your built-in universal remote system. This usually involves pressing and holding one or two buttons in your car until an indicator light starts flashing. You might need to clear existing codes first, as per your car’s manual.
- Simultaneous Transmission: Hold your existing gate remote close to the button in your car you wish to program.
- Press and Hold: Press and hold the transmit button on your gate remote and the chosen button in your car simultaneously. Keep holding both until the indicator light in your car flashes rapidly or changes in a way that indicates successful programming (refer to your car manual for specific light signals).
- Test: Test the programmed button in your car to see if it now operates your gate.
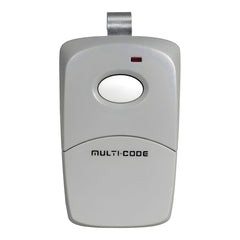
Alt: Multicode 3089 dip switch gate remote, used for programming fixed-code gate openers, showcasing dip switches for code setting.
Alt: Linear DT1 dip switch gate remote, a type of fixed-code remote often used for gate and garage door openers, illustrating a simple programming mechanism.
3. Programming Rolling Code Remotes to Your Car (2-Step Process)
Programming rolling code remotes to your car usually involves a two-step “learning” process for security reasons:
- Initial Car Programming (Remote to Car):
- Follow steps 1-4 from the “Programming Fixed-Code Remotes to Your Car” section above to initially transmit the signal from your existing rolling code remote to your car’s universal remote system. Your car’s system will recognize the remote signal.
- Gate Receiver Learning (Car to Gate Receiver):
- Locate Receiver ‘Learn’ Button: Go to your gate opener’s receiver unit. Locate the “Learn” or “Program” button on the receiver. This button is usually near the terminal strip where wires connect to the gate motor.
- Press ‘Learn’ Button: Press and release the “Learn” button on the receiver. An LED indicator light on the receiver should illuminate or start flashing, indicating it’s in learning mode. You typically have a short window of time (e.g., 30 seconds) to complete the next step.
- Transmit from Car: Immediately return to your car and press and hold the button you programmed in your car (the one you linked to your gate remote in step 1) for a few seconds. You might need to press and hold it a couple of times, as indicated in your car’s manual or gate opener manual.
- Receiver Confirmation: The receiver’s indicator light should blink or change again, indicating it has successfully learned the signal from your car.
- Test: Test the programmed button in your car to operate your gate.
Alt: LiftMaster 892LT rolling code gate remote, commonly used for secure gate and garage access, featuring rolling code technology for enhanced security.
Alt: Hand holding an Elite Gates EG642 rolling code gate remote, demonstrating a typical modern gate opener remote with rolling code technology for increased security.
4. Using the ‘Learn’ Button Method (Direct Car-to-Receiver Programming)
Some newer car systems or gate openers might allow for direct programming from your car to the gate receiver, bypassing the need to use your existing remote as an intermediary. Consult both your car and gate opener manuals to see if this method is supported. The general steps are:
- Access Car’s Programming Mode: Enter the programming mode in your car’s universal remote system, as described in your car’s manual.
- Locate Receiver ‘Learn’ Button: Find the “Learn” button on your gate opener’s receiver unit.
- Press ‘Learn’ Button: Press and release the “Learn” button on the receiver (LED indicator will activate).
- Transmit from Car: Immediately press and hold the desired button in your car. Hold until the receiver’s indicator light confirms successful learning.
- Test: Test the programmed button in your car.
Troubleshooting Common Programming Issues
Encountering problems during programming is not uncommon. Here are some troubleshooting tips:
- Remote Not Syncing:
- Battery Check: Ensure your gate remote batteries are fresh and properly installed.
- Distance: Be close enough to both your car and the gate receiver during programming.
- Clear Codes (Car): Try clearing any existing codes in your car’s universal remote system and start the programming process again (refer to car manual).
- LED Light Not Blinking/Responding:
- Receiver Power: Verify that your gate receiver unit is powered on and functioning correctly.
- ‘Learn’ Button Issues: Make sure you are pressing the ‘Learn’ button correctly on the receiver and within the correct timeframe.
- Gate Not Responding After Programming:
- Compatibility: Double-check the compatibility of your car system and gate opener.
- Rolling Code Sync: For rolling code systems, ensure you completed both the car-to-remote and car-to-receiver learning steps correctly.
- Range: Test the programmed button from within a reasonable operating range of your gate.
- Consult Manuals and Support: If issues persist, thoroughly review both your gate opener and car owner’s manuals for specific troubleshooting sections. Contact the manufacturers’ customer support if needed.
Compatibility: Is Your Car and Gate Opener Compatible?
While universal remote systems in cars are designed to be broadly compatible, some systems or older gate openers might present challenges.
- HomeLink® and Car2U® Compatibility: These systems are generally compatible with a wide range of rolling code and fixed-code gate and garage door openers. Check the HomeLink® or Car2U® websites for compatibility checkers and detailed instructions.
- Older Gate Openers: Older gate openers, especially those without rolling code technology, might have limited compatibility with car-integrated systems.
- Aftermarket Adapters/Solutions: If direct programming isn’t possible, consider researching aftermarket universal remote adapters that can bridge compatibility gaps between your car and gate opener.
Always verify compatibility as much as possible before attempting to program.
Maintaining Your Car-Programmed Gate Opener
Once you’ve successfully programmed your gate opener to your car, proper maintenance ensures continued reliable operation:
- Regular Function Checks: Periodically test the programmed button in your car to ensure it’s still working correctly.
- Battery Maintenance (Remote): While you’ll primarily be using your car’s button, remember that the original gate remote still relies on battery power if it’s used as part of the programming process. Replace batteries in your handheld remote as needed.
- Re-programming (If Necessary): You might need to re-program if you change cars, if the car’s system loses its memory (e.g., battery disconnection), or for security reasons if you suspect unauthorized access.
Conclusion
Programming your gate opener to your car is a worthwhile endeavor that significantly enhances convenience and security. By following this comprehensive guide, understanding your system types, and taking a step-by-step approach, you can unlock the ease of controlling your gate directly from your vehicle. Enjoy the seamless access and added security that comes with this integration!
For a wide selection of gate remotes and accessories, visit: https://elitegates.net/collections/remote-controls