Modern vehicles are increasingly equipped with integrated convenience features, and HomeLink is a standout example. This technology allows you to seamlessly control your garage doors, gates, and other compatible devices directly from your car. Programming your car’s HomeLink system to your garage door opener eliminates the need for a separate remote, streamlining your access and enhancing security. This guide provides a clear, step-by-step process to easily program your car mirror to your garage door opener.
Step 1 – Optimal Vehicle Positioning for Programming
Begin by positioning your vehicle strategically. Park your car facing your garage door, ensuring it’s within approximately 5 feet of the garage. The proximity is crucial for establishing a reliable signal during the programming process. While programming inside the garage is possible if you have access to the garage door opener, starting with the garage door closed from your driveway is generally more convenient, especially as you’ll need to reach the opener unit itself later in the procedure.
Step 2 – Clearing Existing HomeLink Memory
Before initiating new programming, it’s vital to clear any pre-existing settings from your car’s HomeLink system. This is particularly important if you’ve purchased a used vehicle, as it ensures no residual programming from previous owners interferes with your setup. Clearing the memory provides a clean slate for a successful programming experience.
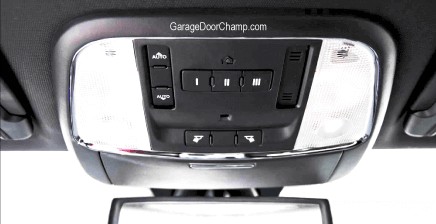
HomeLink buttons are typically located on your rearview mirror or sometimes on the sun visor.
To clear the memory, simultaneously press and hold the two outer HomeLink buttons (usually labeled #1 and #3) for approximately 10 to 20 seconds. Keep holding until the indicator LED light, often orange or green, begins to flash rapidly. Initially, the LED may flash slowly, but the rapid flashing indicates successful memory clearance. In some car models, a solid green LED might signal completion instead of rapid flashing.
To verify the memory is cleared, briefly press and hold any of the individual HomeLink buttons. A slow flashing LED indicates no previous programming is stored for that button, confirming the memory clearing process was successful.
Step 3 – Programming Your Chosen HomeLink Button
Once the memory is cleared, you can proceed to program a specific HomeLink button to your garage door opener. Select any of the HomeLink buttons you wish to use for garage door control. Ensure your vehicle’s ignition is turned on (engine off is acceptable) and that you have your garage door remote control readily available. Position your car close to the garage door while it remains closed.
Simultaneously press and hold the open/close button on your handheld garage door remote and your chosen HomeLink button in the car. Maintain pressure on both buttons until the HomeLink indicator light changes its flashing pattern. It will typically start as a slow flash and then transition to a rapid flash after a few seconds. This rapid flashing signifies that the HomeLink button has successfully learned the frequency signal from your garage door remote.
If you encounter difficulties at this stage, consult the troubleshooting section later in this guide for helpful tips.
Step 4 – Activating the Garage Door Opener’s Learn Mode
After successfully programming the HomeLink button in your car to recognize your garage door remote signal, you need to synchronize it with your actual garage door opener unit. Locate the “Learn” button on your garage door opener motor unit inside your garage.
The “Learn” button is usually situated on the back panel of the opener unit or sometimes on the side of the antenna. It may also be referred to as a “Smart” button. Press and release the “Learn” button on the garage door opener. Immediately after pressing, an indicator LED light on the opener will illuminate. Depending on the model, this light might be solid or flashing, indicating the opener is in learn mode and ready to receive programming signals.
Note: Older garage door openers using DIP switch technology instead of a “Learn” button do not require this step. However, most modern openers with rolling code technology utilize a learn button for enhanced security, necessitating this synchronization step.
Step 5 – Finalizing Synchronization Between Car and Opener
Return swiftly to your vehicle after pressing the “Learn” button on the garage door opener. Now, press and hold the programmed HomeLink button in your car for 3 seconds, then release. Wait for approximately one second, and then press and hold the same HomeLink button again for another 3 seconds, and release. Repeat this press-and-release process, alternating every 3 seconds, up to 2 to 4 times.
During this process, the garage door opener is attempting to recognize the signal from your car’s HomeLink system. Synchronization is successful when your garage door begins to move in response to your HomeLink button presses. This movement confirms that your car mirror is now successfully programmed to your garage door opener.
Vehicle Compatibility with Garage Door Openers
Generally, any vehicle equipped with a HomeLink system is programmable with most garage door openers. Certain vehicle brands like Audi and Tesla might have slightly different programming interfaces, often involving on-screen instructions within the car’s interface. However, the fundamental principle of HomeLink programming remains consistent across most makes and models.
Troubleshooting HomeLink Programming Issues
Encountering difficulties while programming your car’s HomeLink to your garage door opener is not uncommon. Here are some troubleshooting steps:
-
Distance Adjustment: Slightly alter the distance between your garage door remote and the rearview mirror during Step 3. Moving the remote closer or further away can sometimes improve signal reception. Also, re-verify that your car is parked within approximately 5 feet of the garage door.
-
External Receiver Programming: If your garage door system uses an external receiver, attempt to program your car to the receiver unit instead of the main opener unit. The programming steps remain the same.
-
Compatibility Bridge for Yellow Learn Buttons: If you have a Liftmaster, Chamberlain, or Craftsman garage door opener with a yellow “Learn” button, be aware that vehicles manufactured before 2013 might not be directly compatible due to security protocol updates. In such cases, you’ll likely need to purchase a HomeLink compatibility bridge (also known as a repeater). Program your car to this repeater following the standard steps, and the repeater will then communicate with your older opener system.
-
Repeat Programming Steps: Carefully re-attempt all programming steps from the beginning, ensuring each step is followed precisely. Refer to your vehicle’s owner’s manual for any specific HomeLink programming guidance related to your car model.
-
Check Basic Issues: Rule out simple problems such as low batteries in your garage door remote. Ensure your car’s ignition is switched to the ‘On’ position during programming.
-
System Malfunctions: If programming consistently fails after multiple attempts, a fault in either your car’s HomeLink system or the garage door opener system is possible. In some instances, the garage door opener’s circuit board or receiver might be defective. If you suspect a system malfunction, consider contacting a certified garage door repair service for professional diagnosis and repair.
Frequently Asked Questions About Car Mirror to Garage Programming
Can I program my car to the garage without a remote control?
No, a working garage door remote control is generally required to program your car’s HomeLink system initially. The HomeLink system learns the signal from your existing remote.
What should I do if my car won’t program to the garage door opener?
First, confirm compatibility, especially if you have an older vehicle and a newer garage door opener (particularly with a yellow “Learn” button). Consult your vehicle’s owner’s manual or seek assistance from a licensed garage door repair company for compatibility solutions or troubleshooting.
How close does my car need to be to the garage door for programming?
For optimal signal strength during programming, position your car approximately 5 feet or closer to the garage door.