Motor oil is essential for your car’s engine, acting as a lubricant that keeps all the internal parts moving smoothly and preventing wear and tear. Regularly checking your oil level is a simple yet crucial maintenance task that helps ensure your vehicle’s longevity and performance. Experts at Consumer Reports suggest making it a habit to check your oil every other time you stop for gas.
 Woman checking car oil level with a dipstick to maintain engine health.
Why Checking Your Oil is Crucial
Engine oil’s primary function is to lubricate the moving parts within your engine. This lubrication minimizes friction, which in turn reduces heat, prevents engine damage, and helps maintain optimal engine temperature. Low oil levels can lead to increased friction and heat, potentially causing serious engine problems and costly repairs. Regularly checking your oil is a proactive step in vehicle maintenance, allowing you to identify and address low oil levels before they cause significant issues.
When to Check Your Oil: Hot or Cold Engine?
A common question when learning how to check your car oil is whether the engine should be hot or cold. For most vehicles, it’s generally recommended to check the oil when the engine is cold. This is because when the engine is off and cool, all the oil drains back down into the oil pan, providing a more accurate reading on the dipstick. Checking your oil level on a cold engine ensures that you’re getting a true measure of how much oil is readily available to lubricate your engine components.
However, it’s always best to consult your vehicle’s Owner’s Manual for the manufacturer’s specific recommendations. Some car manufacturers may advise checking the oil when the engine is warm. If checking when warm, allow the engine to sit for a few minutes after turning it off to let the oil settle before you proceed with the check. Your owner’s manual is the definitive guide for your specific vehicle model.
Step-by-Step Guide: How to Check Your Oil
Checking your oil is a straightforward process that anyone can learn. Here’s a simple guide:
What You’ll Need
- A rag or paper towel
Checking Your Oil Level – The Process
- Ensure the engine is off: Whether you are checking the oil cold or warm, always make sure the engine is completely turned off before you begin.
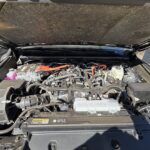
- Locate the dipstick: Open your car’s hood and find the oil dipstick. It’s usually brightly colored (often yellow or orange) and has a handle for easy gripping. If you’re unsure, refer to your owner’s manual for its exact location.
- Remove and wipe the dipstick: Pull the dipstick out completely. Use your rag or paper towel to wipe all the oil off the dipstick. This clean wipe is essential for an accurate reading.
- Reinsert the dipstick: Push the dipstick all the way back into its tube. Ensure it’s fully seated to get a correct oil level measurement.
- Check the oil level: Pull the dipstick out again and look at the end. There will be markings indicating the minimum and maximum oil levels. The oil streak on the dipstick should be between these marks. If the oil level is within this range, your oil level is good. If the oil level is below the minimum mark, you need to add oil.
How Often Should You Check Your Oil?
Regular oil checks are a vital part of car maintenance. As mentioned, Consumer Reports suggests checking your engine oil every other gas fill-up. Making oil checks a routine part of your car care will help you stay on top of your engine’s health and prevent potential problems down the road. Consistent checks ensure your engine is properly lubricated, contributing to its efficient operation and longevity.
By following these simple steps on how to check your oil, you can proactively maintain your vehicle and ensure your engine remains in good condition for years to come.